# Generate Microservices and Micro Frontends
# Overview
This tutorial describes how to use the Entando Component Generator (ECG) to create microservices and micro frontends for deployment to the Entando Component Repository and Entando Applications. The ECG is powered by JHipster (opens new window) and leverages the Entando Blueprint.
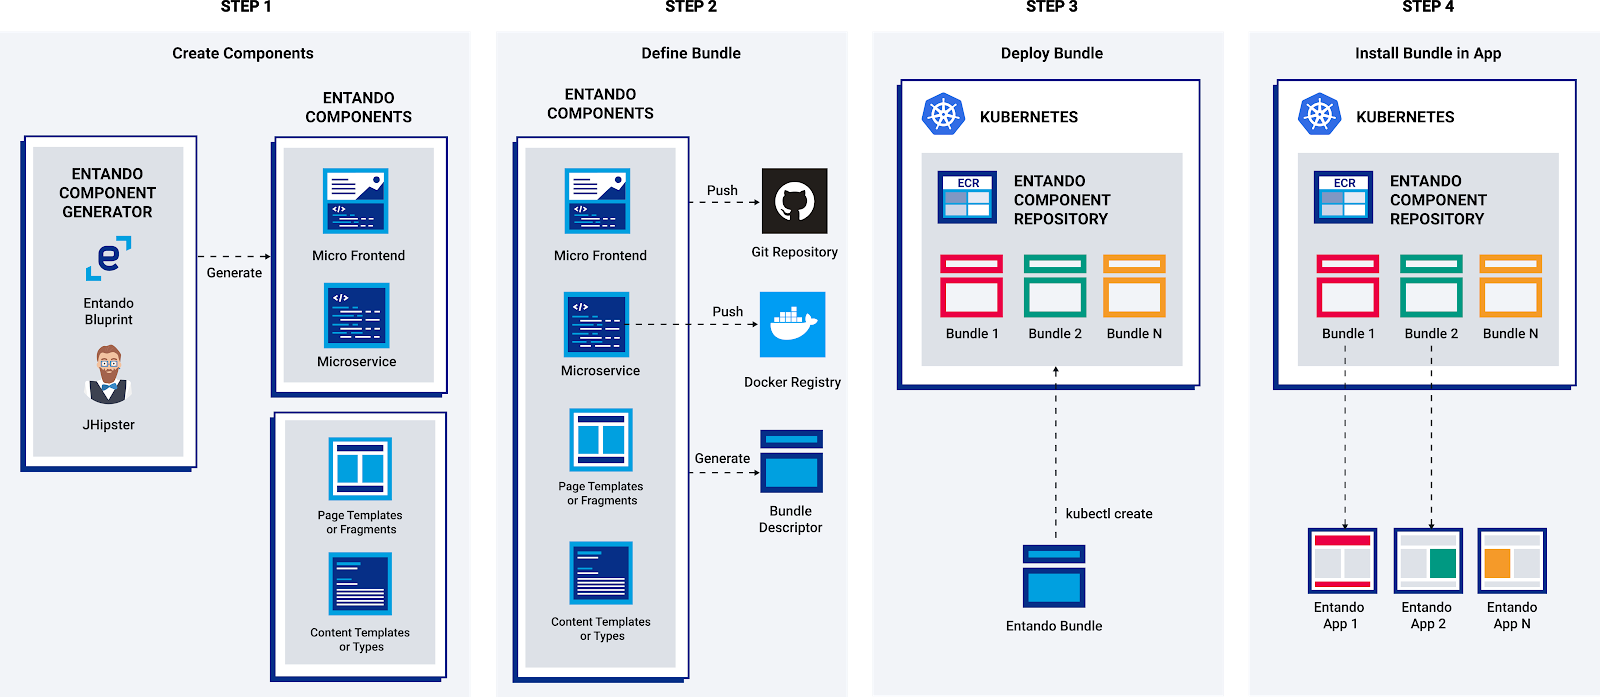
The general flow of component generation is:
- Run the Entando Blueprint to create your components (Spring Boot microservice and optionally React micro frontends)
- Customize and enhance your generated code
- Build an Entando Bundle from your components
- Deploy a Custom Resource for your bundle into Kubernetes
- Install your Entando Bundle into your Entando Application(s)
# Prerequisites
Use the Entando CLI to verify environmental dependencies (e.g. Java, npm, git, JHipster, Entando Blueprint).
ent check-env develop
# Manual Setup
We recommend using the Entando CLI to generate microservices and micro frontends, but you can also manually initialize JHipster and the Entando Blueprint with the following commands. Note: If you choose the manual setup, commands in this tutorial that include ent jhipster should instead use jhipster.
- Install JHipster
npm install -g generator-jhipster@6.10.5
- Install the Entando Blueprint
npm install -g generator-jhipster-entando@6.3.2
# Generate the Project
Whether you elect to use the ent jhipster command or perform a manual setup, the next step is to create a project with microservices.
- Setup a new project directory
mkdir testProject && cd testProject
- Use
ent jhipster(orjhipster) to generate the project skeleton via the Entando Blueprint
ent jhipster --blueprints entando
You'll be presented with a series of prompts to configure your project. These are listed below, with the base values for this tutorial in parentheses. Except where noted in bold, you can input what works best for you. Note that hitting "Enter" will select the default option.
What is the base name of your application?(Up to you)As you are running in a microservice architecture, on which port would like your server to run? It should be unique to avoid port conflicts.(8081)What is your default Java package name?(Up to you)Which *type* of database would you like to use?(SQL) - If no database is selected you'll be building a stateless microservice, which is a valid choice, but the rest of this tutorial won't work.Which *production* database would you like to use?(PostgreSQL or MySQL)Which *development* database would you like to use?(H2 with disk-based persistence)Do you want to use the Spring cache abstraction?(Yes, with the Caffeine implementation)Do you want to use Hibernate 2nd level cache?(Yes)Would you like to use Maven or Gradle for building the backend?(Maven) <-- this is required for EntandoWhich other technologies would you like to use?(Don't select any other technologies)What name would you give to the bundle to share on an Entando digital-exchange?(Up to you)Which is the organization name to use when publishing the docker image?(Enter the name of the organization where you are going to push your Docker image. If you're using your personal Docker hub account enter your username.) <-- this can be changed later as neededWould you like to generate micro frontends when creating entities?(Always)Would you like to enable internationalization support(Up to you)Please choose the native language of the application(Up to you)Please choose additional languages to install(Up to you)Besides JUnit and Jest, which testing frameworks would you like to use?(Up to you)Would you like to install other generators from the JHipster Marketplace?(No)
Next, add an Entity to your microservice and create the corresponding micro frontends. In this tutorial,
Conferenceis the name of the entity that will be added to the application. Remember to replaceent jhipsterwithjhipsterif you are not using the Entando CLI.
ent jhipster entity Conference
You'll be presented with a series of prompts to add fields to your entity. These are listed below, with the base values for this tutorial in parentheses. Input what works best for you, and note that hitting "Enter" will select the default option.
Do you want to add a field to your entity?(Yes)What is the name of your field?(name)What is the type of your field?(String)Do you want to add validation rules to your field?(No)Do you want to add a field to your entity?(Yes)What is the name of your field?(location)What is the type of your field?(String)Do you want to add validation rules to your field?(No)Do you want to add a field to your entity?(No)Do you want to add a relationship to another entity?(No)Do you want to use separate service class for your business logic?(Up to you)- If yes:
Do you want to use a Data Transfer Object (DTO)?(Up to you)Do you want to add filtering?(Up to you)
Is this entity read-only?(Up to you)Do you want pagination on your entity?(Yes, with infinite scroll)
If you asked to be prompted about micro frontends when generating the project:
Do you want to generate micro frontends?(Up to you)
At this point the blueprint will generate controllers, repositories, services, and micro frontends for your entity.
Overwrite src/main/resources/config/liquibase/master.xml?Note: When prompted with a conflict at this stage, you can enterafor "All." This will override existing files with the configuration changes needed for your new entity.
You now have an Entando project, including a Spring Boot microservice with database integration and React-based micro frontends.
# Project Structure
/src/main/dockercontains Docker files to help with local development environments./src/main/javaandsrc/main/resourcescontain the microservice codebase and configuration./uiholds the React-based micro frontends. By default, JHipster generates 3 MFEs per entity to contain the details, form, and table./bundleis used to assemble the project code into an Entando Bundle.
# Next Steps
Follow one of the links below to learn how to assemble and run a bundle locally or deploy it.
- Build and publish a project bundle to deploy your microservice and micro frontends to the Entando Component Repository
- Learn how to run Blueprint-generated components locally in dev mode
- Discover the benefits and features of the Entando Blueprint
- Iterate on your data model using the JHipster Domain Language (JDL)