I recently had an Entando user ask about WebSocket (opens new window) support in the Platform. WebSockets can be very useful for real time system updates, especially those involving one-to-many communications with many recipients.
My stock answer to this kind of question is that it's a development detail and should work, but it's up to each team to implement and support it fully. WebSockets run on TCP so it's a safe answer but I was curious if there would be any issue when using WebSockets in an Entando-managed microservice. Short story, there isn't - but I figured I'd jot down some notes on the implementation. In this case I worked up a quick STOMP example so you'll see that reflected in the naming below.
Note: This post is more of an outline of the procedure, not a step-by-step tutorial, but the source code is linked at the bottom.
# Setup the Entando Bundle
- Start by setting up an Entando bundle with a microservice stubbed out:
ent bundle init stomp-example
cd stomp-example
ent bundle ms add spring-stomp-ms
- Next I used the Spring initializr (opens new window) to create the microservice with Maven, Spring Boot 2.7.14, and Java 11. This is similar to the steps in our basic Spring Boot tutorial with the addition of the WebSocket dependency.
	Project=Maven
	Language=Java
	Spring Boot version=2.7.14
	Group=com.entando.example
	Artifact=spring-stomp-ms
	Name=spring-ms
	Description=Demo project for Spring Boot with Stomp
	Package name=com.entando.example.stomp
	Packaging=Jar
	Java=11
	Dependencies:
	  #under WEB: Spring Web
	  #under OPS: Spring Boot Actuator
      #under MESSAGING: WebSocket
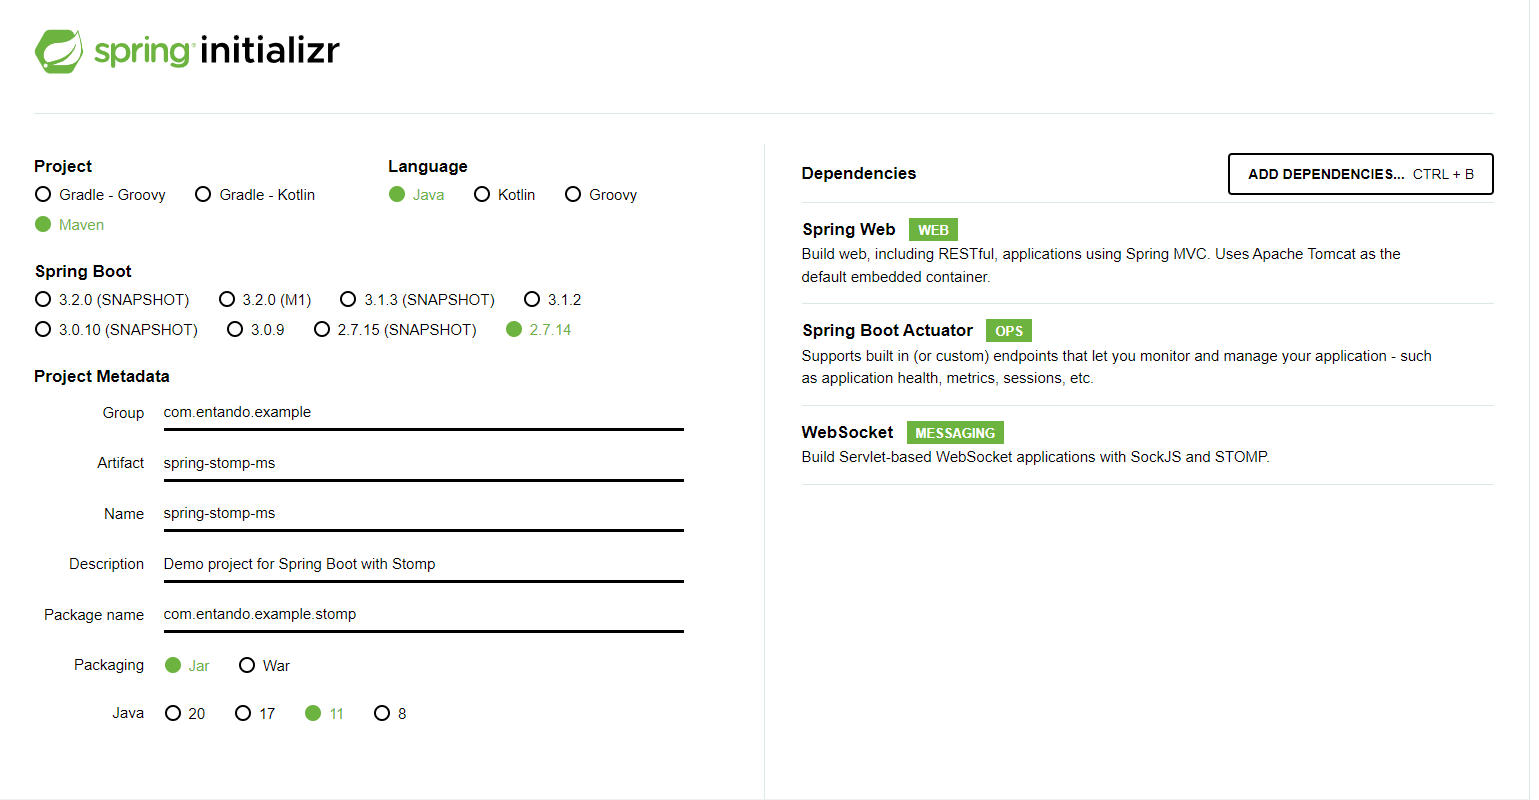
- Generate the service and unzip the output into the
microservices/spring-stomp-msdirectory.
# Implement the STOMP service
Next we need to implement the service endpoints. Here I used Baeldung's Intro to WebSockets with Spring (opens new window) tutorial for guidance, so refer to this page for additional details.
- Add dependencies to the
pom.xml:
		<dependency>
    		<groupId>org.springframework</groupId>
    		<artifactId>spring-websocket</artifactId>
		</dependency>

		<dependency>
    		<groupId>org.springframework</groupId>
    		<artifactId>spring-messaging</artifactId>
		</dependency>

		<dependency>
			<groupId>com.fasterxml.jackson.core</groupId>
    		<artifactId>jackson-core</artifactId>
		</dependency>

		<dependency>
    		<groupId>com.fasterxml.jackson.core</groupId>
    		<artifactId>jackson-databind</artifactId>
		</dependency>
- Create
configuration/WebSocketConfig.javato enable the broker and endpoints. In this case I've also added a CORS config (the setAllowedOrigins call) for test purposes, but this should be disabled in a production deployment, typically using appropriate application profiles.
@Configuration
@EnableWebSocketMessageBroker
public class WebSocketConfig implements WebSocketMessageBrokerConfigurer {

    @Override
    public void configureMessageBroker(MessageBrokerRegistry config) {
        config.enableSimpleBroker("/topic");
        config.setApplicationDestinationPrefixes("/app");
    }

    @Override
    public void registerStompEndpoints(StompEndpointRegistry registry) {
         registry.addEndpoint("/chat")
                //NOTE: this is not recommended for production use and should be replaced by dev/prod profiles
                .setAllowedOrigins("http://localhost:8081")
                .withSockJS();
    }
}
- Create
entity/Message.javaandentity/OutputMessage.javafor the incoming and outgoing messages, respectively:
public class Message {

    private String from;
    private String text;

    public String getText() {
        return text;
    }

    public String getFrom() {
        return from;
    }
}
package com.entando.example.stomp.entity;

public class OutputMessage {

    private String from;
    private String text;
    private String time;

    public OutputMessage(final String from, final String text, final String time) {

        this.from = from;
        this.text = text;
        this.time = time;
    }

    public String getText() {
        return text;
    }

    public String getTime() {
        return time;
    }

    public String getFrom() {
        return from;
    }
}
- Add
controller/ChatController.javato map the chat messages to the message broker:
@Controller
public class ChatController {

    @MessageMapping("/chat")
    @SendTo("/topic/messages")
    public OutputMessage send(final Message message) throws Exception {

        final String time = new SimpleDateFormat("HH:mm").format(new Date());
        return new OutputMessage(message.getFrom(), message.getText(), time);
    }
}
- Add the following two lines to
src/main/java/resources/application.propertiesso the service will: 1) run on the conventional Entando port, and 2) use the standard healthcheck path.
server.port=8081
management.endpoints.web.base-path=/api
- From the bundle directory, start the service:
ent bundle run spring-stomp-ms
- Confirm the service is working as expected with two basic checks:
- Access
http://localhost:8081/chatwhich should show the textWelcome to SockJS! - Access
http://localhost:8081/api/healthwhich should respond with{"status":"UP"}.
# Add an HTML page to test the service
Here I followed the Baeldung tutorial and created a simple HTML page for testing the basic STOMP chat client.
Note: In a real implementation, the sockjs library can be included in a micro frontend (e.g., React, Angular, etc.), or an existing STOMP component can be reused (e.g., react-stomp (opens new window)), but that is left as an exercise for the reader.
- Create
main/webapp/index.html:
<html>
    <head>
        <title>Chat WebSocket</title>
        <script src="https://cdn.jsdelivr.net/npm/sockjs-client@1/dist/sockjs.min.js"></script>
        <script src="stomp.js"></script>
        <script type="text/javascript">
            var stompClient = null;

            function setConnected(connected) {
                document.getElementById('connect').disabled = connected;
                document.getElementById('disconnect').disabled = !connected;
                document.getElementById('conversationDiv').style.visibility
                  = connected ? 'visible' : 'hidden';
                document.getElementById('response').innerHTML = '';
            }

            function connect() {
                var serverUrl = 'http://localhost:8081/chat';
                var socket = new SockJS(serverUrl);
                stompClient = Stomp.over(socket);
                stompClient.connect({}, function(frame) {
                    setConnected(true);
                    console.log('Connected: ' + frame);
                    stompClient.subscribe('/topic/messages', function(messageOutput) {
                        showMessageOutput(JSON.parse(messageOutput.body));
                    });
                });
            }

            function disconnect() {
                if(stompClient != null) {
                    stompClient.disconnect();
                }
                setConnected(false);
                console.log("Disconnected");
            }

            function sendMessage() {
                var from = document.getElementById('from').value;
                var text = document.getElementById('text').value;
                stompClient.send("/app/chat", {},
                  JSON.stringify({'from':from, 'text':text}));
            }

            function showMessageOutput(messageOutput) {
                var response = document.getElementById('response');
                var p = document.createElement('p');
                p.style.wordWrap = 'break-word';
                p.appendChild(document.createTextNode(messageOutput.from + ": "
                  + messageOutput.text + " (" + messageOutput.time + ")"));
                response.appendChild(p);
            }
        </script>
    </head>
    <body onload="disconnect()">
        <div>
            <div>
                <input type="text" id="from" placeholder="Choose a nickname"/>
            </div>
            <br />
            <div>
                <button id="connect" onclick="connect();">Connect</button>
                <button id="disconnect" disabled="disabled" onclick="disconnect();">
                    Disconnect
                </button>
            </div>
            <br />
            <div id="conversationDiv">
                <input type="text" id="text" placeholder="Write a message..."/>
                <button id="sendMessage" onclick="sendMessage();">Send</button>
                <p id="response"></p>
            </div>
        </div>

    </body>
</html>
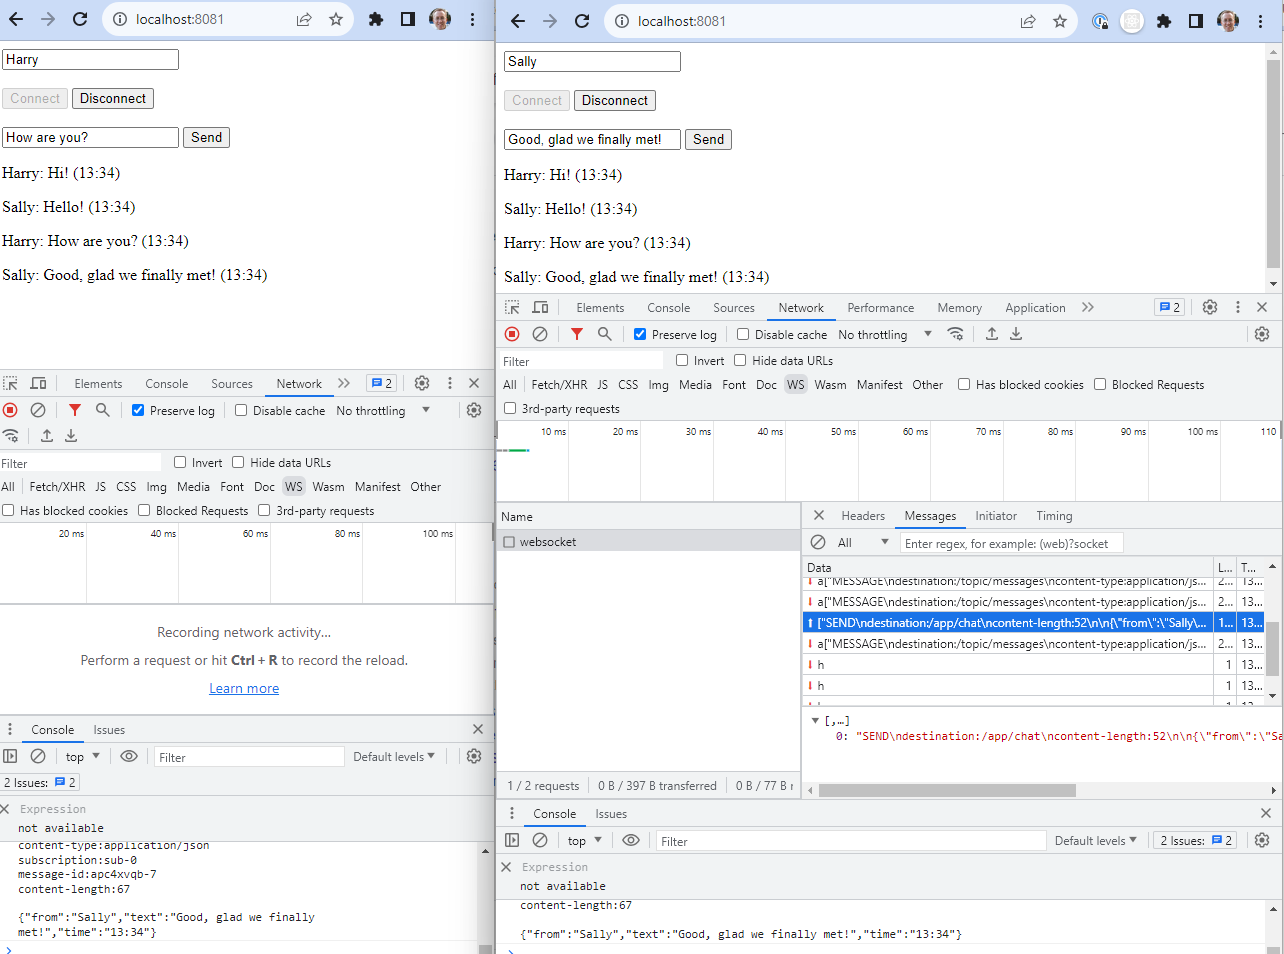
Go to
http://localhost:8081to see a basic chat interface with options to connect to the service and send messages.Open two (or more) browser windows and observe the publish/subscribe behavior in action.
The browser console can be used to see the different STOMP messages due to console logging included in
stomp.js. In Chrome, the network traffic can be observed by filtering on WS, selecting the WebSocket resource, and viewing the Messages pane for that socket.
# Deploy the bundle to Entando
You should now be able to build, deploy, and install the bundle using the standard steps.
ent bundle packent bundle publishent bundle deployent bundle install# Test the live service
- Once the bundle is deployed, examine the ingress paths and check that the service is working correctly. The ingress path looks something like this:
http://YOUR-HOST/stomp-example-f9335a57/spring-stomp-ms/chat
- Copy the
webapp/index.htmlto a new file (e.g.,prod.html) and update the serverUrl to point to your endpoint:
var serverUrl = 'https://YOUR-HOST/stomp-example-f9335a57/spring-stomp-ms/chat';
- Access the new file at
http://localhost:8081/prod.htmland confirm the chat service is working.
Note: A CORS error will break the page if you did not include the WebConfig rule to allow access from
localhost:8081.
Note#2: This step requires having the local service running to serve the HTML file but any web server will do, e.g.,
serve -l 8081 microservices/spring-stomp-ms/src/main/webapp/
# Observations
Implementing a basic chat client using Spring Boot 2, WebSockets, and Entando 7.2 was straightforward and fairly self-explanatory. Please feel free to join the community (opens new window) and ask questions if your experience is different!