# Caching and Clustering
The tutorials below cover the basic steps to setup and validate a clustered instance of the Entando App Engine.
NOTE
When building your deployment architecture it is important to review your goals, hardware, networking, and application specific setup and to optimize your App Engine deployment for your environment. None of the configurations or deployments below will address every type of application or every type of deployment. The configuration and testing examples below can be used as building blocks to create a deployment architecture that works for your application.
# Storage Requirements for Clustered Entando Apps
In order to scale an Entando Application across multiple nodes you must provide a storage class that supports
a ReadWriteMany access policy. There are many ways to accomplish this including using dedicated storage providers
like GlusterFS. The cloud Kubernetes providers also provide clustered storage options specific to their implementation like Google Cloud File in GKE or Azure Files in AKS.
The storage class that supports ReadWriteMany must be marked as the default storage class in the deployment
TIP
You can also scale an Entando Application without clustered storage using a ReadWriteOnce (RWO) policy by ensuring that the
instances are all scheduled to the same node. This can be accomplished using taints on other nodes. Be aware of the pros and cons of scheduling
instances to the same node. This will give you protection if the application instance itself dies or becomes unreachable and will help
you get the most utilization of node resources. However, if the node dies or is shutdown you will have to wait for Kubernetes to reschedule the pods to a different node and your application will be down.
# Clustering
This tutorial reviews setting up a clustered Entando App Engine using the default Infinispan Library Mode deployment that ships with the quickstart App Engine in the entando-de-app. The goal of the tutorial is to deploy a clustered instance of the App Engine and verify that we have a high availability and scalable deployment of the application.
# Prerequisites
- An existing deployment of an Entando App or the ability to create a new one
- If you haven't created a deployment yet or don't have a yaml file for an Entando deployment follow the quickstart here.
- The Entando deployment must use an RDBMS. Clustered instances will not work correctly with in memory databases and a
dbms: noneconfiguration.
# Creating a Clustered App Instance
- Create an Entando deployment via the helm template or edit an existing deployment yaml file.
- Edit the deployment and find the
EntandoAppin the yaml file (towards the bottom).- If you're editing an existing deployment you can use
kubectl edit <deployment>or you can edit the deployment prior to kicking off the installation.
- If you're editing an existing deployment you can use
- kind: "EntandoApp"
      metadata:
        annotations: {}
        labels: {}
        name: "quickstart"
      spec:
        dbms: postgresql
        replicas: 1
        standardServerImage: wildfly
        ingressPath: /entando-de-app
- In the
EntandoAppchange the number of replicas to 2 (or more as desired) - Save the file
- Deploy the application or wait for the application to update if editing an existing deployment
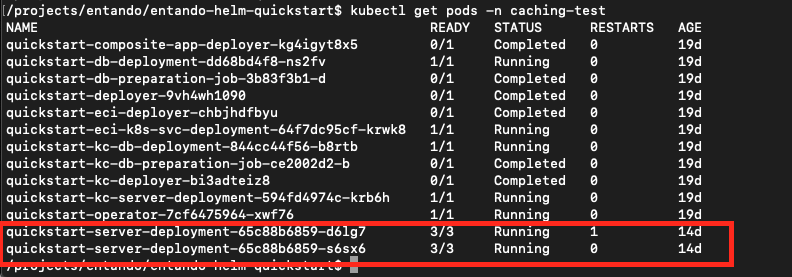
- Run
kubectl get pods -n <your namespace>to view the pods in your deployment - You should have two
server-deploymentpods in your namespace with three containers each. See the screenshot below:
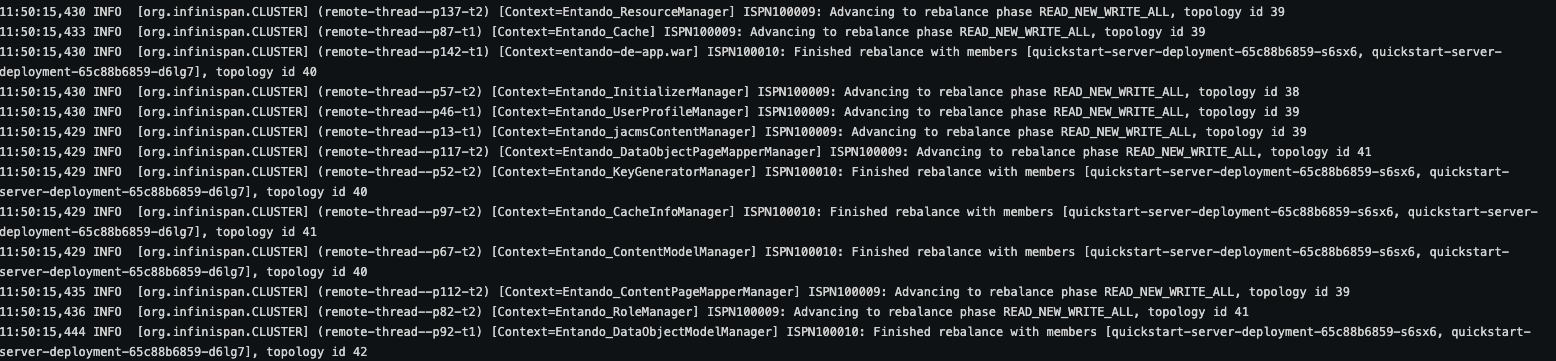
- Finally, you can look in the logs of the
server-containerin either pod and you will see logging related to different instance joining the cluster and balancing the data between the instances. See the screenshot for an example. Your actual logs will vary:
The tutorials below will take you through validating and testing the clustered and cached instances.
NOTE
If you are on OpenShift you can use the Scale Up arrows and other settings available in the OpenShift console if you prefer
# Validating the Clustered Instances
This is an advanced tutorial and is not required or recommended for most deployment scenarios or users.
This tutorial will walk you through steps to validate that the clustered instances are working in your environment and that you have created a high availability deployment. There are many ways to validate your clustering.
- Complete the creating a clustered instance tutorial above or have an existing clustered Entando App instance available for testing
- Get the URL for your
entando-de-appwithkubectl get ingress -n <your namespace> - Open the URL in a browser of your choice and ensure that the application is working
- Open a new browser window in an incognito or private browsing mode. do not navigate to the app
- The only reason for private mode is to ensure that no data is cached and you're receiving a copy of the running application
- In the next steps you'll delete a pod in your cluster and verify that your application is still getting served. Kubernetes will automatically restore the desired number of replicas so you'll need to perform the validation test before the new replica is launched. In most environments this will be around one minute but it will vary.
- Delete one of the server deployment pods in your clustered instances with
kubectl delete <pod-name> -n <your namespace>- There are other ways to do this. You could also shell into the server-container and manually kill the running app process with
kill -9 357. - If you wanted to test at the hardware level you could manually terminate a node in your cluster (ensuring that the pods are scheduled to different nodes)
- There are other ways to do this. You could also shell into the server-container and manually kill the running app process with
- In your private/incognito browser window open the URL to your
entando-de-app - See that the application continues to render while the pod you deleted is no longer present
- Wait for Kubernetes to restore your deleted pod
- Check that the application continues to render after the pods are restored
# Caching Validation
Validating the shared cache can be done in a similar fashion to the clustered instance validation. The high level steps are:
- Deploy a clustered instance (see creating a clustered instance tutorial)
- Create data using the app builder (pages, page templates, content etc.) using the external route for the application
- Take note in the logs of which instance processed the request
- Terminate that instance
- Fetch the data created and ensure that the recently created data is returned
Another option for validating the shared cache involves creating a custom deployment with two distinct Entando App instances. In this scenario you would not use the replicas option in the deployment. This has the benefit of keeping all of the instances running and validating the configuration by creating distinct pods for the Entando App Engine so that each instance can be exposed on endpoints separately.
The high level steps for this setup are reviewed in Appendix A
# Configuring and Deploying with Redis
This tutorial covers deploying an Entando App Engine instance using Redis as a cache for data served by the app engine. For more information on the cache configuration for the App Engine checkout the reference documentation
# Deploy Redis to Kubernetes
- Create the redis deployment and expose the endpoints
kubectl create deployment redis –-image=redis:6
kubectl expose replicaset.apps/redis-687488bdd4 --port=6379 --target-port=6379 -n <your namespace>
- Install the Redis CLI for your environment per https://redis.io/topics/rediscli (opens new window)
- Get the IP for your Redis deployment
kubectl get service -n <your namespace>
- Validate your deployment
Should respond PONG
redis-cli -h 10.43.99.198 -p 6379 ping
Should increment each time
redis-cli -h 10.43.99.198 -p 6379 incr mycounter
# Configure implementation
- Use git to clone the
entando-de-apprepository
git clone https://github.com/entando/entando-de-app
- Fetch the tags and checkout the release tag and create a branch for your customization
git fetch --tags
git checkout tags/v6.3.22 -b 6.3-redis
- Open the pom.xml file of the
entando-de-app - Remove the Infinispan dependencies from the pom
<!-- infinispan -->
 <dependency>
     <groupId>org.infinispan</groupId>
     <artifactId>infinispan-core</artifactId>
     <version>9.4.8.Final</version>
 </dependency>
 <dependency>
     <groupId>org.infinispan</groupId>
     <artifactId>infinispan-commons</artifactId>
     <version>9.4.8.Final</version>
 </dependency>
- Add the Redis caching plugin to the pom
<dependency>
    <groupId>org.entando.entando.plugins</groupId>
    <artifactId>entando-plugin-jpredis</artifactId>
    <type>war</type>
</dependency>
- Save the pom
- Build and push a custom image for the
entando-de-appfollowing these steps - Create or download a deployment file. For example, use the
entando.yaml
curl -L -C - -O https://raw.githubusercontent.com/entando/entando-releases/v6.3.0/dist/qs/entando.yaml
- Update the image in the deployment yaml file to point to your custom
entando-de-appimage with Redis. The line to change is in theConfigMapand is noted below
entando-de-app-wildfly: >-
    {"version":"6.3.10","executable-type":"jvm","registry":"docker.io","organization":"entando"}
- Add environment variables to the
EntandoAppin the deployment yaml file for the Redis address and Redis password for your deployed Redis instance. The variables to create are:
REDIS_ADDRESS
REDIS_PASSWORD
For example,
NOTE
This example uses a secret for the
REDIS_PASSWORDwhich is recommended. You can also hardcode the password in the yaml for testing, however, creating passwords in clear text in your deployment files is not recommended. Create and use a secret for the password as a best practice.
This is a reference example for the EntandoCompositeApp and is not a complete deployment. Utilize this as an example to create your configuration in a complete deployment.
kind: "EntandoCompositeApp"
apiVersion: "entando.org/v1"
metadata:
  name: "quickstart-apps"
  namespace: test
entandoStatus:
  serverStatuses: {}
  entandoDeploymentPhase: "requested"
spec:
  components:
    - kind: "EntandoApp"
      metadata:
        annotations: {}
        labels: {}
        name: "quickstart1"
      spec:
        dbms: none
        replicas: 2
        standardServerImage: wildfly
        ingressPath: /entando-de-app
        ingressHostName: quickstart1.test.dynu.net
        environmentVariables:
          - name: REDIS_ADDRESS
            value: <your redis URI. For example redis://localhost:6379)
          - name: REDIS_PASSWORD
            valueFrom:
              secretKeyRef:
                key: password
                name: quickstart1-redis-secret
                optional: false
        ....
# Appendix A - Creating Separately Deployed App Engine Instances
This appendix provides a high level example of creating a deployment with two distinct Entando App Engine instances. This type of deployment can be used to create pods that can be separately accessed and managed. It is not recommended to use this type of deployment for typical development or production environments. Utilize the ability of Kubernetes and the Entando infrastructure to manage your replicas automatically.
- Create two different instances of the
EntandoAppcomponent inside of theEntandoCompositeAppin your deployment yaml - Configure both EntandoApp instances to use the same database and JGroups configuration if using Infinispan. If using Redis configure both instances to point to the same Redis instance
- Deploy the application
- Expose the separately deployed
EntandoAppinstances with distinct endpoints - Create data in one instance via the App Builder or via API
- Validate that the App Builder returns the same data in the other instance
A partial example of that deployment:
kind: "EntandoCompositeApp"
apiVersion: "entando.org/v1"
metadata:
  name: "quickstart-apps"
  namespace: test
entandoStatus:
  serverStatuses: {}
  entandoDeploymentPhase: "requested"
spec:
  components:
    - kind: "EntandoApp"
      metadata:
        annotations: {}
        labels: {}
        name: "quickstart1"
      spec:
        dbms: none
        replicas: 1
        standardServerImage: wildfly
        ingressPath: /entando-de-app
        ingressHostName: quickstart1.test.dynu.net
        environmentVariables:
          - name: PORTDB_URL
            value: jdbc:postgresql://quickstart-postgresql-db-service.test.svc.cluster.local:5432/quickstart_postgresql_db
          - name: PORTDB_USERNAME
            valueFrom:
              secretKeyRef:
                key: username
                name: quickstart1-portdb-secret
                optional: false
          - name: PORTDB_PASSWORD
            valueFrom:
              secretKeyRef:
                key: password
                name: quickstart1-portdb-secret
                optional: false
          - name: PORTDB_CONNECTION_CHECKER
            value: org.jboss.jca.adapters.jdbc.extensions.postgres.PostgreSQLValidConnectionChecker
          - name: PORTDB_EXCEPTION_SORTER
            value: org.jboss.jca.adapters.jdbc.extensions.postgres.PostgreSQLExceptionSorter
          - name: SERVDB_URL
            value: jdbc:postgresql://quickstart-postgresql-db-service.test.svc.cluster.local:5432/quickstart_postgresql_db
          - name: SERVDB_USERNAME
            valueFrom:
              secretKeyRef:
                key: username
                name: quickstart1-servdb-secret
                optional: false
          - name: SERVDB_PASSWORD
            valueFrom:
              secretKeyRef:
                key: password
                name: quickstart1-servdb-secret
                optional: false
          - name: SERVDB_CONNECTION_CHECKER
            value: org.jboss.jca.adapters.jdbc.extensions.postgres.PostgreSQLValidConnectionChecker
          - name: SERVDB_EXCEPTION_SORTER
            value: org.jboss.jca.adapters.jdbc.extensions.postgres.PostgreSQLExceptionSorter
          - name: JGROUPS_CLUSTER_PASSWORD
            value: xxxxxxxx
          - name: OPENSHIFT_KUBE_PING_LABELS
            value: EntandoResourceKind=EntandoApp
          - name: KUBERNETES_LABELS
            value: EntandoResourceKind=EntandoApp
          - name: POD_IP
            valueFrom:
              fieldRef:
                fieldPath: status.podIP
    - kind: "EntandoApp"
      metadata:
        annotations: {}
        labels: {}
        name: "quickstart2"
      spec:
        dbms: none
        replicas: 1
        standardServerImage: wildfly
        ingressPath: /entando-de-app
        ingressHostName: my.host.name
        environmentVariables:
          - name: SPRING_PROFILES_ACTIVE
            value: "default,swagger"
          - name: PORTDB_URL
            value: jdbc:postgresql://quickstart-postgresql-db-service.test.svc.cluster.local:5432/quickstart_postgresql_db
          - name: PORTDB_USERNAME
            valueFrom:
              secretKeyRef:
                key: username
                name: quickstart1-portdb-secret
                optional: false
          - name: PORTDB_PASSWORD
            valueFrom:
              secretKeyRef:
                key: password
                name: quickstart1-portdb-secret
                optional: false
          - name: PORTDB_CONNECTION_CHECKER
            value: org.jboss.jca.adapters.jdbc.extensions.postgres.PostgreSQLValidConnectionChecker
          - name: PORTDB_EXCEPTION_SORTER
            value: org.jboss.jca.adapters.jdbc.extensions.postgres.PostgreSQLExceptionSorter
          - name: SERVDB_URL
            value: jdbc:postgresql://quickstart-postgresql-db-service.test.svc.cluster.local:5432/quickstart_postgresql_db
          - name: SERVDB_USERNAME
            valueFrom:
              secretKeyRef:
                key: username
                name: quickstart1-servdb-secret
                optional: false
          - name: SERVDB_PASSWORD
            valueFrom:
              secretKeyRef:
                key: password
                name: quickstart1-servdb-secret
                optional: false
          - name: SERVDB_CONNECTION_CHECKER
            value: org.jboss.jca.adapters.jdbc.extensions.postgres.PostgreSQLValidConnectionChecker
          - name: SERVDB_EXCEPTION_SORTER
            value: org.jboss.jca.adapters.jdbc.extensions.postgres.PostgreSQLExceptionSorter
          - name: JGROUPS_CLUSTER_PASSWORD
            value: xxxxxxxx
          - name: OPENSHIFT_KUBE_PING_LABELS
            value: EntandoResourceKind=EntandoApp
          - name: POD_IP
            valueFrom:
              fieldRef:
                fieldPath: status.podIP