# Update the Project Data Model
# Overview
This tutorial explains how to use the Entando Component Generator powered by JHipster (opens new window) to quickly update the data model for your Entando project.
# Prerequisites
Leverage an existing project or create a project and navigate to the root folder. The steps below assume you're working in the top-level project directory.
# Tutorial
- Use JHipster to extract the current application description. The resulting JHIpster Domain Language (JDL) file contains your project's application configuration and entity definitions.
ent jhipster export-jdl export.jdl
- To strip unnecessary information, create a new file comprising only the elements that describe entities. If you followed the project generation tutorial, that could be as simple as
entity Conference {
  name String
}
You can enhance this definition by adding fields, entities, table mappings, field validation, etc. This is easily accomplished with the online JDL-Studio or corresponding JHipster IDE plugins/extensions (opens new window).
Create a new file containing your enhanced data model, e.g.
conference.jdl.
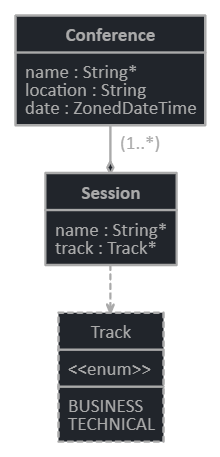
entity Conference {
  name String required
  location String
  date ZonedDateTime
}

entity Session {
  name String required
  track Track required
}

enum Track {
  BUSINESS, TECHNICAL
}

relationship OneToMany {
   Conference to Session
}
The above adds two fields to the Conference entity, introduces the Session entity plus an enum, and creates a mapping between the two entities. Below is the updated data model in JDL-Studio:
- Import the JDL file into your application. You will be prompted with the option to generate MFEs if this was requested during project generation.
ent jhipster import-jdl conference.jdl
If the original project structure has been retained, this step will update your data model, add entries to Liquibase to upgrade database schema during deployment, add service methods to your microservice, add fields to your MFEs, etc.
- You can now build your updated project and run it locally or deploy it to Entando. To execute a comprehensive local test, use the following commands to build the project
ent prj build
ent prj xk start
ent prj be-test-run
ent prj fe-test-run
then start Keycloak, the microservice, and one of the MFEs.
Definition enhancement through build and test can be repeated as many times as needed throughout the life of your project.