# Entando Identity Management System
The Entando Identity Management System is based on open source Keycloak. Entando Applications rely on a Keycloak instance that is either externally installed or specific to an application. The architecture and requirements to customize your Keycloak instance are described below.
# Logging into your Keycloak Instance
Keycloak is protected by a Secret deployed to your Entando Kubernetes instance. You can query Kubernetes for the Secret's default admin credentials via the following, modifying this command to use your environment's namespace and Secret name.
Note: Use the ent CLI to send commands to Kubernetes from the host machine.
kubectl get secret default-sso-in-namespace-admin-secret -n entando -o go-template="{{println}}Username: {{.data.username | base64decode}}{{println}}Password: {{.data.password | base64decode}}{{println}}{{println}}"
To find the Secret name, run the command below and search for the Secret that ends in namespace-admin-secret.
kubectl get secrets -n entando
# Authentication
All authentication is powered by Keycloak on Entando. This ensures that a micro frontend can call a microservice with a token available to the client.
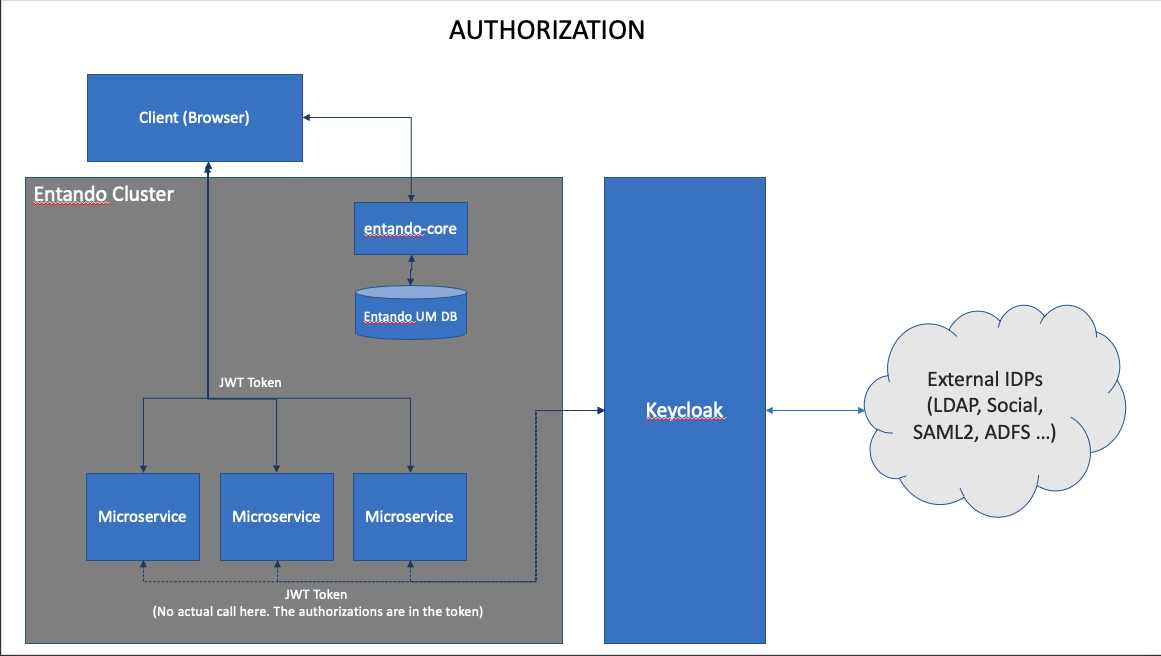
Entando implements Keycloak as a central point of authentication to provide a single, unified view of identity. This architecture increases portability. Keycloak acts as an abstraction layer to the underlying Identity Provider (IDP), allowing Entando to integrate into other IDPs without modifying the source.
# Authorization
# Role Assignment for Plugins/Microservices
Keycloak authorizes microservices using clients and roles. Authorizations are stored in a JSON Web Token and available to services when invoked.
Below are the steps to grant a user one or more roles for a specific client. This controls permissions when configuring the microservice. Note: when a microservice is installed in Entando, a corresponding client (and set of roles) is created per its plugin definition.
- Login to Keycloak, which for non-external Keycloak instances is the base URL of your running Entando application followed by
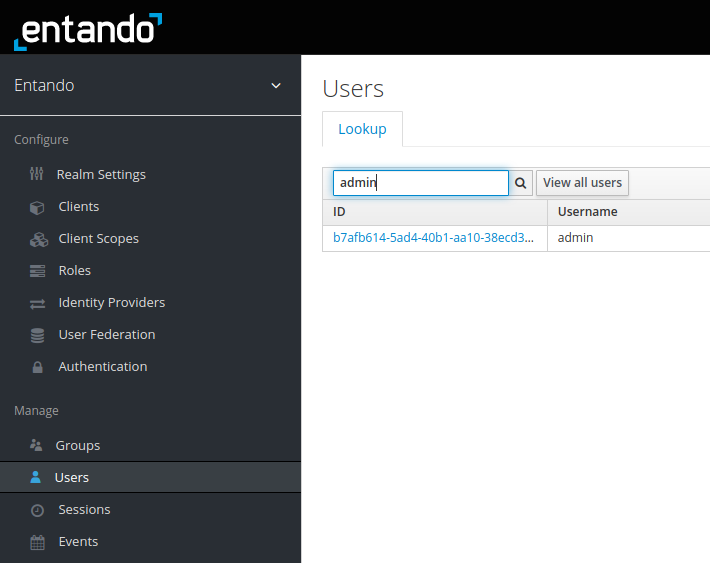
/auth/, e.g. http://YOUR-HOST-NAME/auth. In a standard Entando installation, the base URL can be verified withkubectl get ingress/default-sso-in-namespace-ingress. - Select
Usersfrom the menu on the left - Use the search box to find the appropriate user, e.g. "admin"
- Click on the user ID
- Click on the
Role Mappingstab - Use the
Client Rolesdrop-down menu to specify the microservice client - Select from the client's
Available Roles
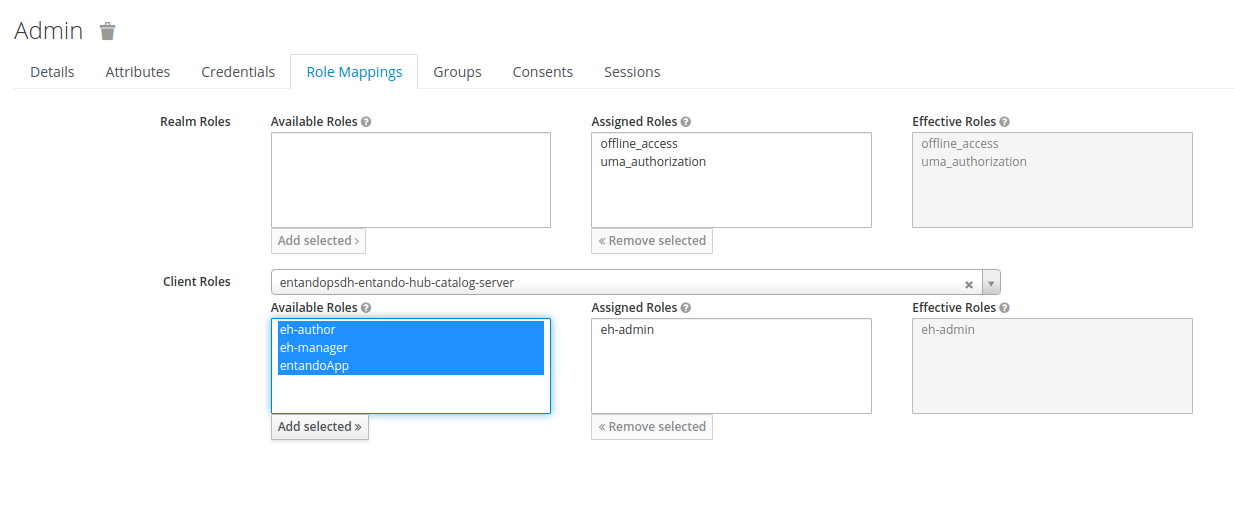
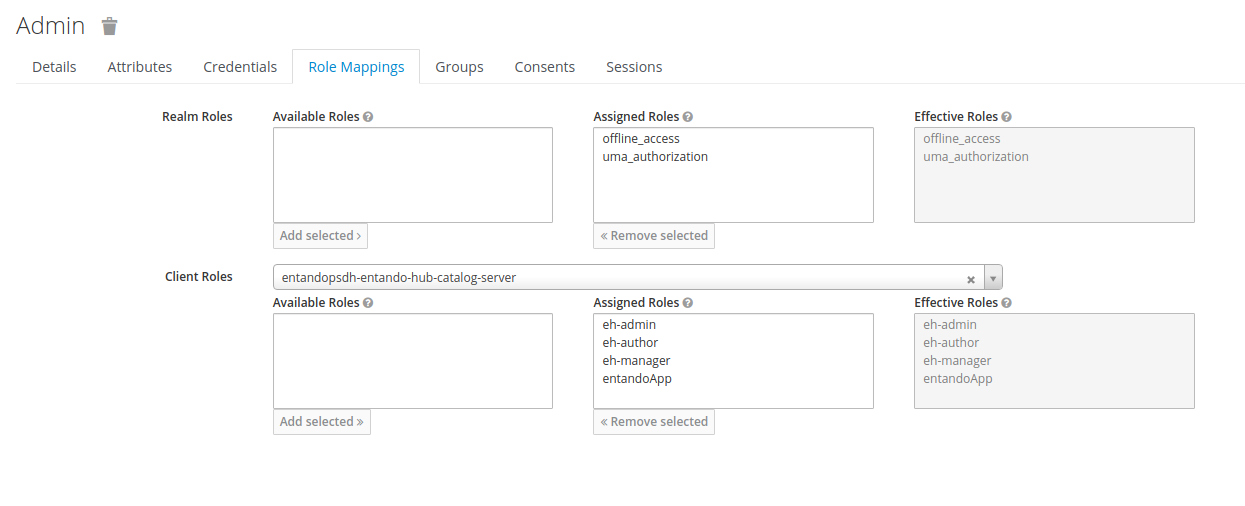
- Use the
Add Selectedbutton to move the desired roles toAssigned Roles. These will subsequently appear underEffective Roles.
# Core
When a user is authenticated to the entando-core via Keycloak, a copy of that user is added to the entando-core user management database to enable WCMS functionality. Within the App Builder, WCMS roles and groups can be assigned to a user for access to App Builder functions or portal-ui content in the runtime application.
The code that copies the user into the entando-core can be customized per implementation to automatically create groups and roles. See the entando-keycloak-plugin (opens new window) for details of the code that copies users and data to the WCMS database. The README in that project includes properties that are available to your Entando Application.
See KeycloakAuthorizationManager.java (opens new window) for an example of adding attributes programatically. In particular, refer to the processNewUser (opens new window) method.
# Social Login
Keycloak allows Entando to provide social login as an out-of-the-box capability. Keycloak Social Identity Providers (opens new window) documents how to enable and configure social logins in your Entando Applications.
# One Time Passwords
Keycloak enables One Time Passwords (OTP) login to Entando Applications. See Keycloak OTP Policies (opens new window) to configure and enable OTP in your application.
# Themes, Look and Feel
Developers can customize the look and feel of the login page, as well as the identity management system that ships with Entando. The Keycloak Theme Documentation (opens new window) provides instructions for creating your own theme. Alternatively, you can modify the Entando Theme (opens new window).